Good news 🚀 Anyone who regularly adds candidates manually knows how time-consuming it can be to constantly switch between a resume and the input fields in our system. Scrolling, copying, pasting, returning, searching again for where you left off. These are small actions, but together they cost concentration and time.
That's why we're introducing a new display in Jobtoolz. From now on, when you add a candidate, you'll see the resume and the input fields together on one screen. The document is on the left, the candidate file on the right. This allows you to quickly transfer data without switching between windows.
Step by step: adding a new candidate
Step 1: Open the relevant job vacancy
In the main menu, go to Vacancies and click on the vacancy for which you want to register the candidate.
Make sure you select the correct vacancy, as the application will be linked to this position immediately. Do you work with similar job titles? If so, check the department or location to avoid any misunderstandings.
Step 2: Click on “Add application.”

Within the recruitment process for the specific vacancy, you will find the Add Application button at the top right.
When you click on this, a new screen will open where you can add a candidate. This is when the new CV view becomes visible.
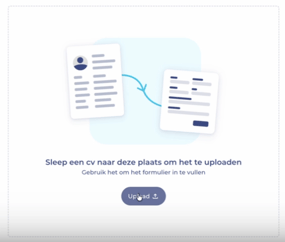
Step 3: Upload the resume and transfer the data
In the window that opens, first upload the candidate's resume.
Once the document has been added, you will see:
- the complete CV on the left
- the fields to be filled in on the candidate form on the right
You can now systematically transfer the data while continuing to view the CV. Think of:
- first and last name
- contact details
- work experience
- education
- any additional information that is relevant to your organization
A practical tip from everyday HR reality: start with the contact details and check them carefully right away. A correct email address and phone number are crucial for smooth follow-up. Then you can calmly fill in the other fields.
Do you work with mandatory fields in your candidate file? If so, you will see them clearly marked. This way, you can be sure that you don't overlook anything essential.
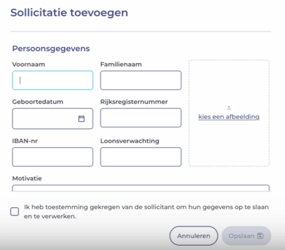
Step 4: Confirm consent for data processing
At the bottom of the screen, you will find confirmation that you have received permission to process and store the candidate's data.
This is not a formality. As an HR professional, you are responsible for the correct processing of personal data. Only tick this box if you have actually received permission, for example via email or an application form.
By explicitly including this step in the process, Jobtoolz supports you in a careful and compliant working method that is also GDPR compliant.
Step 5: Save the candidate
Have you entered all the information correctly? Then click Save.
The candidate will now be added to the selected vacancy. From here, you can continue to follow up on him or her in your own recruitment process.